Time required: 5-10 minutes depending on sheet size
Difficulty: Easy/Easy-Medium
Works on Google sheets and Excel (But my guide is for sheets)
Quick guide summary for advanced users:
(No paint diagram version)
- Insert blank column somewhere in your sheet.
- Number your new column with odd numbers only, to the bottom of your data
- Where your odd numbers end, start adding even numbers. Continue until you get to +1 of your odd numbers above.
- Add even numbers below data.
- Ensure to repeat each even number for the number of rows you want to insert
- Continue this until your last even number
- Highlight your data (Just press CTRL + A to highlight all)
- Click Data > Click sort range….
- Sort by your new column
- Right click the header of your temporary column and delete
Disclaimer: This is a function I struggled with. I can’t write visual basic, and upon Googling it, all I could find answers for were how to simply add rows between 2 bits of data, not a list. If that’s what you need to do, see this link from Google, its simple enough, but not what I wanted to achieve.
Disclaimer 2: This method is based solely on trial and error and minimal Google sheets knowledge, but it works.
Please feel free to tweet me a better solution and ill include it here 🙂 (@TheSteveMills)
Illustrated Walkthrough for the rest of us!
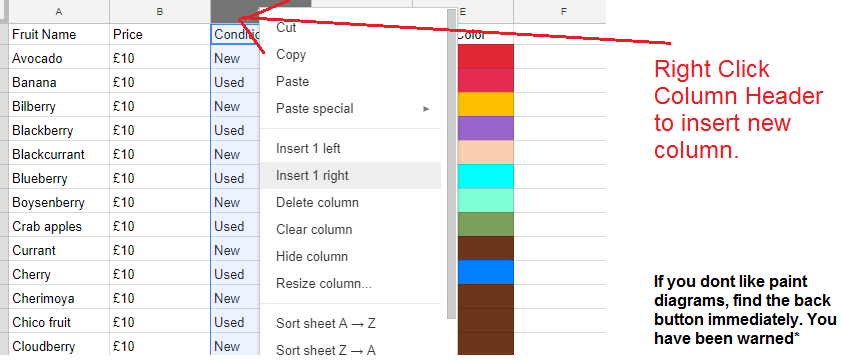
Step one: Choose your data, add a blank column
- Insert blank column somewhere in your sheet.
Let’s assume you need to insert 10 rows, between each row. Firstly you will need to insert a blank column so we can number it.
Lets stick it in the middle of the sheet, just to show we can do that, see example:

Step two: Give your new temporary column odd numbers
- Number your new column with odd numbers only, to the bottom of your data
Enter in the first few odd numbers (1, 3, 5, 7… etc) > Then shift-select all of those numbers > Then Drag down to the end of your data. See the image below, left image, then dragged down on the right….

Step 3: Add even numbers below your data in your new column
- Where your odd numbers end, start adding even numbers. Continue until you get to +1 of your odd numbers above.
(This is the hardest bit)
Here you want to start again at the bottom of your data, and simply tap in the even numbers. You need to repeat each even number for the amount of rows you want to insert between your existing data. So..
- Add even numbers below data.
- Ensure to repeat each even number for the number of rows you want to insert
- Continue this until your last even number
In this case, lets use three as an example:

This step takes the most time. It might take you a few min to tap your even numbers in.
Pro Tip: To get a nicely formatted colourful Google Sheet – Highlight your data, Choose colour palette.
Not enough people do this. Upgrade your Google Sheets presentation
Step 4: Sort the sheet – and done!
This is the last bit, its easy.
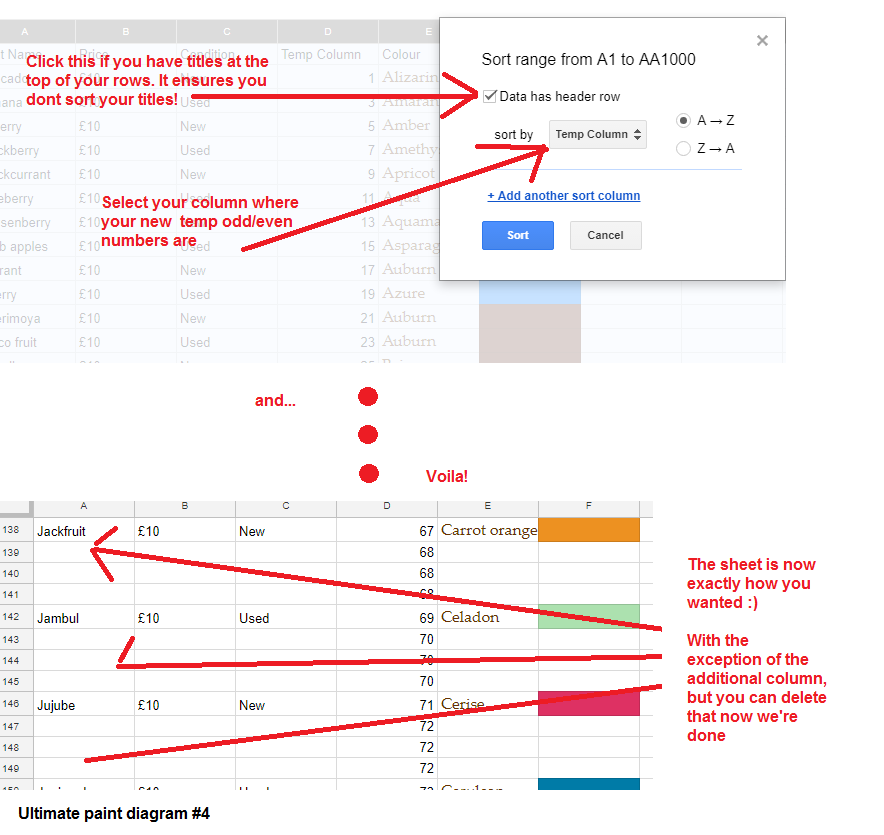
- Highlight your data (Just press CTRL + A to highlight all)
- Click Data > Click sort range….
- Sort by your new column
- Right click the header of your temporary column and delete

Now you are finished. The whole process shouldn’t take long. 5-10 mins at max, it took me around 30 mins to do 10,000 rows of data spaced by 10 each, which would have probably taken me hours and hours to do manually.


